[Tech Talk] Moment: Take Your Life Back, One Minute at a Time

Image result for moment application

Being born in the crux of the 1980’s – December of 1984, to be precise – places me in the precarious position where I remember life before the internet, but have all the benefits of life in the post-technological boom era. I’ve seen televisions get slimmer and longer, watched as phones lost their umbilical cords, observed the evolution of VHS as it forayed into Super VHS, Laser Disks, and then eventually to DVD, Ultra HD, Blu Ray and now 4K; my Sony walkman was upgraded to a disc player, then an mp3 player, an iPod and now I can basically play music from my refrigerator.  And then, last but most certainly not least: the cell phone.  What was at one point an electronic brick that had the basic operations of a fancy calculator, has eventually evolved into an electronic ‘blob’ that’s acquired all the functions of literally anything else you could keep in your office or wallet besides your ID card, like calendars, notepads, a Rolodex, books, your credit cards, maps, DSLR cameras, video games, movies, foreign language dictionaries….the list could go on and on.

When the intellectual power of the world can fit in the palm of your hand, it sounds almost anachronistic to think that there’s a phone application out there whose only goal is to get you off your phone, and back into the moment – but thankfully, there is – and let me tell you, it works.  But let’s take a step back for a second and understand what leads to people being stuck on their phones.

For the most part, your cell phone is like the fridge: you open your cell phone in the morning because your brain is hungry for information, and your phone puts it at the ends of your fingertips.  Drowsy from strange dreams and famished for facts, you eagerly ingest anything your phone gives you – only it’s the fast food of information, not a lot of substance, and definitely not filling.  So, every hour or so, you open it – hoping there’s new food there, forgetting it’s the same fridge you ate from earlier – same shit, new timestamp. Untitled

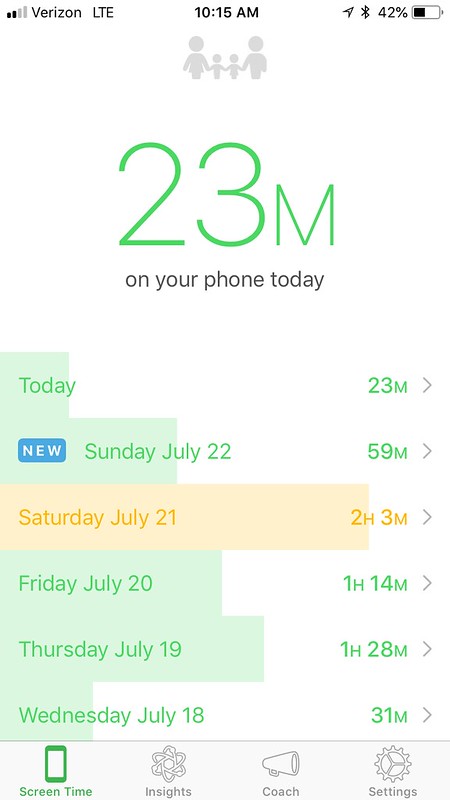
Not to throw myself under the digital bus, but out of all my friends – I’d say I’m the most addicted to my phone.  I’m sure it’s somewhere in my genes, but my parents and grandparents have been large influences in the terms of technological revolution, so I’m not surprised that I had an affliction for information, and a hearty addiction to my phone. My personal irony, is I first found out about moment through a friend’s

Untitled

Instagram story, where they’d posted screen shots of how much time they used to spend on their phone versus how much time they spend after using the application; I was sold, immediately.

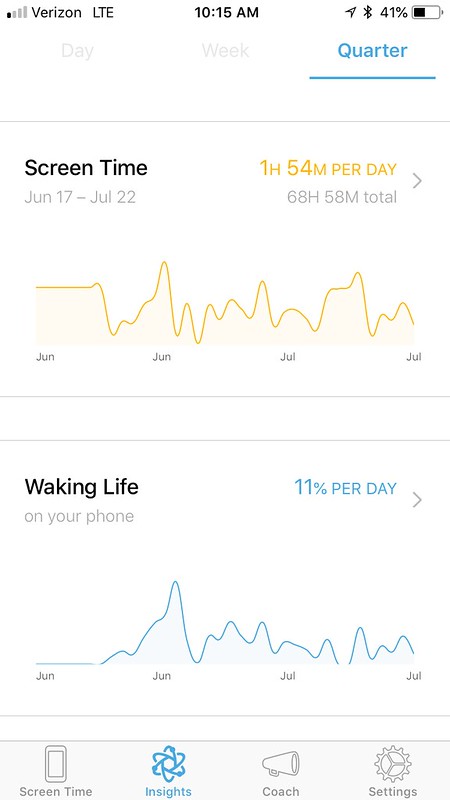
Moment, created by Kevin Holesh, is a saucy little minx; silently and invisibly running in the back of your phone, unless you ask for alerts, that is..  You feed it screen shots of your application use, and it lets you know how you’re fairing by cataloging your total use, including use by specific applications.

After observing myself for a few days, I decided to enlist in the free 7 day boot camp, Bored & Brilliant, which is a great introduction into getting off your phone and back to reality; shortly after I bit the bullet and got the Pro version, and did the 14 day boot camp. I’ll be honest, I’m actually on my second iteration of it because I really need the practice of leaving my phone alone.  The boot camps walk you through 21 essential tasks that will curb your enthusiasm for your digital reality and replace it with tangible moments, from not taking your phone into the bathroom, to cleaning up your home screen to remove all social apps, turning off your notifications and actually calling the people you love.  Through the app, I have small reminders on my phone to let me know, in 20 minute intervals, how long I’ve spent and I’m a huge fan of their ‘No Screen Time’ alarm: I set mine for 7-9pm at night, and it literally annoys me into putting my phone face down with a loud reminder every time I engage it.

Untitled

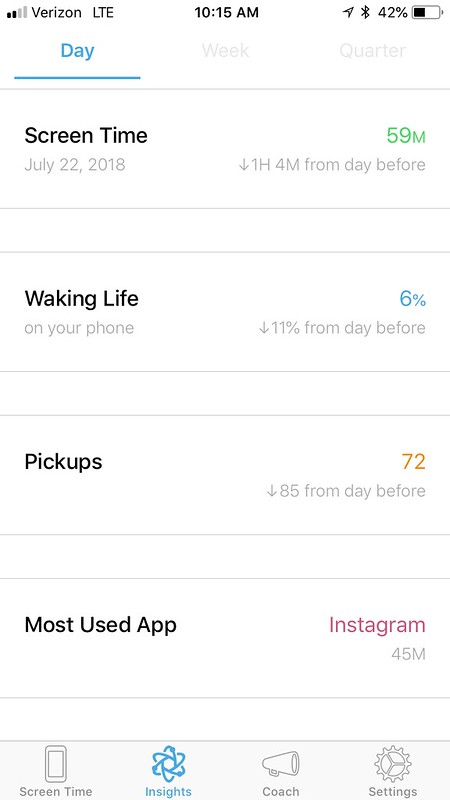
When I started using the application, I was on my phone up to three hours a day – now, it’s rare if I break an hour.  Plus, over the last three weeks, I’ve gone to sleep earlier, woken up without anxiety, spent more time with my cats, finished more books, had more fun conversations with friends, shared my time with my husband and have been overall immensely happier than before.  I’ve not only recommended the application to all my friends, but I’ve gone as far as downloading it on both my dad and Danny’s phones.

To download Moment for the iPhone yourself – head here! For you Android users, cue the sad violins but there isn’t currently an application for you – good news though: there’s a signup to get notified the second it’s available on multiple platforms.  For more on the applications genesis, and how it can help you take your life back – head to their website.

What do you do to curb your cell phone addiction and what tips do you have for others wishing to do the same?


[Oh, Snap!] Dive Into DSLR Photography

You are an aperture through which the universe is looking at and exploring itself.”

― Alan W. Watts

Serenity in the Sequoias

Being a photographer is a bit like if you give a mouse a cookie:  if you give a photographer a point a shoot, they’ll want a dSLR; give them a dSLR and they’ll want a prime lens; give them a prime lens and they’ll want a wide angle and a zoom lens; then they’ll want studio lights, a professional flash…and well, you get it – it becomes an addition of the best sort.

From as long ago as I can remember, my step-mother would always have a camera attached to her hip. She captured poignant moments of an awkward childhood, from gleefully following my dad and I on our beach adventures or feeding ducks, and capturing birthday parties and basketball games; as I grew older, I found myself in awe of her keen eye – finding the simple beauty in nature, exploring minimal architecture, capturing the first bloom of a rose, or creating a mood with striking black and white imagery.   At least once a month, the three of us would wander down to Stanford Shopping Center for an afternoon outing to the now defunct One Time Photo, enjoying some sorbet from the ice cream shop next door while we patiently waited for the film to develop.  Wandering back through the photo store, I let my fingers unknowingly explore film from different ISOs as the printer that took up almost two-thirds of the store whirred with excitement. Then, I started stock piling disposable cameras – with a quick flick of the wrist, and the wind up flash, they became my quick introduction to pre-digital photography.

Untitled

Finally, when I was in high school, through a combination of technological advances and parents caving to their teenage daughter: I was given my first digital camera.  Within the photo world, there’s an ever present debate between the merits of Canon versus Nikon, with both the Sony Alpha and Panasonic Lumix lines not far behind.  But in my family, there wasn’t ever a choice – we’re a Canon + Mac family, through and through; so it began: first with a Canon Powershot, and then a Digital Elph.  Fast forward to now, and the technology for your cell phone’s camera has caught up to the most basic point and shoots, and your most basic iPhone or Android has the rudimentary functions of a camera. How-the hell-ever, in a sense you’re still dependent on your technology to do most of the heavy lifting.  Enter the DSLR.  I had my first real introduction to them in college – when I worked in retail to make some extra cash, some of my coworkers were attending the Brooks School for Photography.  I eagerly lapped up every iota of information I could as I sat in through product shoots and photoshoots; truth be told I moved to Los Angeles because of my love of modeling but it wasn’t until recently that I’ve learned how much I prefer being behind the camera, versus in front of it.


As I forayed my way into the Music Industry five years ago – I realized cell phones and point and shoots simply can’t capture the depth and detail the way the professional cameras can; not to mention, with DSLRs – you can go from capturing a moment to creating a moment.  Leaving your camera in Auto relegates each camera function to its internal camera, meaning that even though you’re pressing the shutter to capture the photo – it’s actually the camera’s AI that determined the richness of color, depth of field and focus.  Conversely, in Manual, when each camera function now relies on the user’s aptitude and emotion in the moment, twenty photographers could take the same photo and each produce a very different image.  I’ll admit that for the longest time, the DSLR scared me – it was intimidating, clunky, with what seemed like way too many buttons but after almost four years of watching Danny make magic with the 6D, I’ve finally mustered up the courage to carry it around for the day and get a few pictures that I’m happy with.

Back in the Spring two years ago while we gallivanted through Sequoia – there was something in the air that was so inspiring, it lured my creative nature out of hiding and brought it out to play.   It was frustrating trying to understand settings on the fly, adjusting for almost each image to get it the way my mind’s eye saw it, but as is the thing with life: you can’t get better at the things you don’t try.  Every once and a while for the next months after, I’d pick up the camera, fire a few images I was unhappy with and politely place it back where I’d found it – until I found the right resources, books and mentors to help me get my bearings.  In the time Danny and I have been together, he’s gone from a self taught amateur to a contributor for Getty Images; it’s beyond impressive. What he always tells me is that everyone – every single one of us – sees the world through their own unique prism, and it’s only through the exploration of your own creativity that you can convey those images to everyone else.

Getty VillaRegardless of whether you’re surrounded by gear heads, mentors or photographers, the best thing you can do is get some real hands on experience while stocking up on excellent resources.  I started on Canon 6D for Dummies, which was a great introduction to all things DSLR from the bottom up: lenses, features, menus, camera set up and some more intermediate functions like HRD and Multiple Exposure images, setting up the WiFi and adjusting the White Balance manually.   Even though making your way through the manual page by page might seem like a bore – after reading through Canon for Dummies, it also felt absolutely necessary to learn the core tools of the trade.  Next time you pick up a camera, do yourself a favor and just play around with the settings, comparing images to fully understand what each button can do.Related image

Next up, I migrated to the more  advanced Canon 6D: From Snapshots to Great Shots, which was more of a top down approach to the settings based on epic images, along with some informative asides on F-Stops, ISO and Shutter Speed while diving into each function of the camera; and let me tell you: this is the most important thing to understand.  The Shutter Speed is the length of time that your lens is open to absorb light,while the aperture – or F-Stop, controls the depth of field that the camera focuses on.  Finally, the ISO controls the cameras sensitivity to light and the ways the camera processes detail. I just got my paws on The Photographer’s Playbook  which has a menagerie of photography exercises for anyone, amateur to professional. Here’s the thing – you can read books til the cows come home, sit in on photo shoots as the second shooter or an assistant, or pull up Youtube tutorials to walk you through the basics but the best experience will always be true experience.   If you’ve been itching to pick up a camera, just do it – you’ll be surprised to find your mind working in new and creative ways to capture a moment, and trust me – you’ll be just as hooked as I am.  For anyone looking to jump in – Best Buy has amazing Open Box deals, as does Amazon, while F Stoppers has a great online repository of resources.

If you’re in the market to take your photography to the next level, F Stoppers is a wonderful online resource as well. Not to mention,

Photo bugs – what are some of your favorite pieces of gear? Let me know in the comments below!

[Tech Talk] 5 Key iPhone Upgrades in iOS 10

Unless you’ve masterfully been dipping and dodging digital rocks for the last week, then you’re aware that there’s been a new update to the Apple iOS and this time, they’re shaking things up. The opening bugs from the new system have been zapped, and the risk of owning an expensive brick have diminished exponentially so I think it’s safe for everyone to get on the train. As of today, almost a third of prior users have done the damn thing and upgraded their devices.  However, before you climb aboard – it’s helpful to understand what changes you’re getting yourself into.

As a somewhat recent iPhone convert (RIP my beautiful Android and my addition to all things LG), there are some features that I feel I’m still getting used to on the iPhone; other times, it’s as if Apple is taking more and more from Camp Android, and the latest update is absolutely no exception. With the iOS 10 update there’s a handful of both ergonomic changes and functional changes, not to mention a new color to add to your collection. If you have an iPhone6 or earlier, you’ll unfortunately be missing out on a few of the clutch components that iOS 10 has to offer – primarily anything to do with 3D sensors and touch screen, especially as more companies jump in on the fun.  An inconvenient technological ploy to get you to upgrade? Potentially. But –  will it work? Definitely.

There’s No Place Like Home

Of all the changes to get used to, using the Home Button to unlock the phone might be the largest.  For the last few years, we’ve all been swiping like it’s hot, so for me – I have a good amount of unlearning to do.  This is the most intuitive changes that Apple has made to the iPhone in a few iterations, but it’s also proving to be the most difficult to get over.

Lift Up to Light Up

No longer do we have to live in an age of button pressing on your phone to catch up on your notifications or the time.  Now, all you have to do is simply raise your phone to wake it up.  For those of you that are weary of someone else picking up your phone and being able to read the notifications, don’t you fret – there are ways to edit what’s seen.

Swipe to Snap

Seems like Apple finally realized what everyone wants immediately when they reach for their phone, the time, the notifications – and a way to take a quick pic.  Thank goodness one of the two swipe screens is for the Camera. The other side screen is your widgets – instead of being a pull down screen from the top, they’re now a lot more accessible.

Let Bedtime Put You to Sleep

Maybe it’s a symptom of not wanting to completely be an adult yet, but the idea of a ‘bedtime’ is terrifying – and even more so for my fiance whenever I mention having one. Thanks to the update from Apple, now I can actually set a bedtime reminder – just in case I’m busy marathoning Mr. Robot and Penny Dreadful and think I’ll have no problem going on 3 hours of sleep the next day (note to self, you’re 31 going on 32, not 23 going on 13…)

Make Messages Personal

For all those times you’d rather send a handwritten something than a barrage of bitcode, this update is for you.  Next time you’re in your messages, turn the screen into landscape mode to put your words into your own handwriting. If you’re feeling funny – add a GIF straight from Bing’s search schematics; if you’re feeling flirty – try sending a message with invisible ink.

These are just my five favorite updates, but there are plenty more: edit your live photos,  delete root applications like Stocks, utilize the new and improved search tool, play around with Siri now that she’s been linked up to more applications, transcribe voicemails, collaborate on notes, adjust the brightness on the flashlight or use ‘Moments’ to create little slideshows of your recent memories.

What are your favorite updates inside the new iOS? Let me know in the comments below!


[Life Hack] Bring Your Color Schemes and Dreams To Life

img_4236

Life is like a canvas, and with each moment we fling technicolor paint onto it over and over again, haphazardly layering abstract vision onto linear paths; the continual result is a personal universe, vibrant and blossoming to the brim with color.  Fortunately, coloring the rest of our lives from our apartments, homes and dorm rooms to websites  and weddings is a bit more straightforward.  While an affinity towards individual colors is a simple formula of RGB, choosing the breadth of a color scheme can become slightly overwhelming – especially, apparently, if you’re me.  Every time I pick two colors I enjoy, then try and settle on a third I’m reminded that two is a party but three is definitely a crowd – so you have to choose right.  Enter: the internet.

Adobe color.png

Thanks to some technological geniuses, there are a variety of apps that make the process essentially dummy proof and in the midst of my (re)search for help, I found a treasure trove of answers.  I was trying to paint two birds with one brush, looking to re-do the office in our apartment and wrapping my head around a color scheme for my wedding. Each came with their own monsters.  Back when I was a kid, my mom was redoing the inside of our house and after pouring through scraps of carpet and paint swatches for the living room and her room – she did, at that time, what I fathomed to be unthinkable: let me decide how I wanted my room to look.  Looking back on it, I’d have to say that light blue walls with pink door trim and a lavender carpet still stands as an eccentric expression of my fourth grade mind, a decision that I relive every blue moon when I go back home and visit. As for picking colors for my wedding, let’s just say this – though I’m most certainly a novice at this wedding game, I don’t plan on staying one but I do plan on doing this wedding thing only once – and doing it all sorts of right.

Desktop

For the wedding inspired, Wedding Wire has an insurmountable repository of resources – which includes a very simple decision tree for wedding colors.  Personally, I think they’re a good place to start, but beyond being a great jumping off point it’s nothing to write home about.  Instead, I would lean towards a tried and true favorite – AdobePaletton or ColourLovers, well – when they’re back online.  With Colour Lovers – you can create a personal profile, save your palettes and browse for ideas.  On the other hand, Paletton offers multitudes of preset ways to break down the color wheel – Tetrads, Triads, and Adjacent Colors – in addition to Freeform, plus you have the ability to export your information. I have to hand it to Adobe though, their site is beautifully ergonomic and allows you to upload your own images to create an easy breezy color scheme, but Paletton has my attention.

Mobile

The discovery of a stunning color combination is one thing, but an active and informed direction is quite another.   Kiss your interior decorating color woes goodbye because bless their hearts, the good folks at Sherwin-Williams went ahead and made a color app for their collection of paints called Color Snap for iOS.  You can also access the database via Android, or through their website.

For the iPad lovers, go and get your paws on ColoRotate – where you can work with a 3D render of the color scale to find your perfect palette. Even better? It can sync up with Photoshop.

image description

For good measure, if the curioisity is getting at your cat – try a book on color therapy, or Chromotherapy, and understand the colors on a more intuitive, intimate level.

What sort of ingenious methods have you used to curate your perfect color collection? Let me know in the comments below!

[Tech Talk] Painting and Photography Collide with Prisma

img_3667

Have you ever wanted to marinate inside of a moment? Venture into mind melding visions of alternate realities while mediating comfortably in place? If you’re my kind of human, then you’re answer is undeniably, unequivocally – yes.  In my opinion, we’re all several shades of guilty – from real dreaming to daydreaming, and everything in between, as humans our escape fantasies eagerly, effortlessly and egregiously effuse from our souls like pheromones in search of a higher purpose, catalyzing creativity and breaking us free of old molds and mindsets.  To me, it’s part of the reason we create, coddle and crave the arts: through music, literature, art and theater – we discover new, previously hidden parts of our personalities while filling our soul with passion like a warm meal on a cold night.

Photography is an out of body experience where distortions of reality, mind melding visions of what’s possible and bends in time and space, painting – double so.  But unfortunately some of us (waves hand), weren’t blessed with a drawing gene or with a paintbrush in their hand  My stick figures are relatively lackluster and the cat face I’ve been trying to draw for the last 31 years hasn’t gotten much better. Suffice it to say, I’m in awe of true artistry when it comes to painting, drawing and all things in between and will try ad nauseam. So, when I caught wind of a photo app that alters your images with filters of popular artists – I was immediately sold; hook, line and sinker.

It’s happened before, and my heart swoons as it happens over, and over again: every once in a blue moon, a smart phone photography fad stops me dead in my tracks and requires hours of endless exploration.  Now that we’re 7 solid months into this year, I can safely proclaim that Prisma has been that app. Just a quick upload of a square sized photo (thank you, Instagram), and you’ll be on your way to fantastical results.  Once inside the app, Prisma applies an intricate and advanced learning algorithm to your photos that combines artificial intelligence with neural networks.  Basically, it’s like Deep Dream, Photoshop and Instagram had a psychedelic love child and it doesn’t matter if that last sentence made sense to you or not – because any way that cookie crumbles, the results are simply stunning.

Try on the tantalizing stylings of esteemed artists ranging from contemporary pop art legends Roy Litchenstein and Andy Warhol to classic stylings of Van Gaugh and Picasso, with detailed renderings that from a repository that looks like the lovechild of Android Jones art, fractals and street art.  There are also nods to artists such as Miyazaki, Kadinsky, Mucha, Chagall, Hokusai and Kadinsky – as well as eras of artistic prowess like Impressionism, Gothic Art, Manga, and more. Once your new work of art manifests in front of your eyes, you’ll have the option of taking the photo at 100 proof, or adjusting the edits down to a smaller scale.  If you just tap into your settings you can remove the watermark from the app, and last but certainly not least – it’s free! The only slight downfall of the application is the need to be connected to the Internet to query the algorithms to work – as the app gains popularity, the servers are also noticing a surge and have rendered themselves as over capacity; quick solution – just try, as try again – you’ll get through eventually!


From top, Left to Right: Tears, Urban, Tokyo, #GettUrban, Illegal Beauty, Dreams, Mononoke, Gothic, Curly Hair

My current favorite filters include Tokyo, Urban, and the Natalie Ratkovski-inspired Illegal Beauty – and I think I’ve even found a favorite way of manipulating the photos a second time using Instagram’s Layout app and creating a photo stack from the same image.  The results? All sorts of magical.


Did I pique your photography curiosity? i surely hope so, this is one of the most fun photography apps I’ve played with in a while – and admittedly, I play with a LOT!  The proof is in the blogged pudding, head here to check it out

Download for iOS | Download for Android

For fantastic edits and more information on Prisma, head to their website or social channels:

Website | Facebook | Twitter | Instagram

[Tech Talk] Say Sayonara to Facebook Image Compression

No matter if you’re an amateur photographer or an expert photo editor, if you load your photos to any sort of web server or social media site then you face the issue of image compression and for some of us – the results can look like a near nightmare.  Vibrant nuances of color, sleek lines and keen tones are lost to algorithms that take redundant chunks of your data’s bits and bytes.  The eventual result is that by pairing down the “redundancies” you’re left with a photo that your 10 year old cousin could have taken with last year’s iPhone.  Yikes.  Good news is there’s a fix for that, and I’m here to share the good news.

In the past few years, I’ve grown a lot more accustomed to editing photos in Lightroom as opposed to Photoshop.  Though I’m proud of most everything I can do – it’s felt like the one thing I couldn’t do was get the pretty picture to appear in Facebook the way I want.  I’m incredibly thankful that first, I’m not the only person to experience this problem, and secondly that I’ve come across multiple resources helping me fix the issue. So I can’t very well take all the credit, but I did do all the internet sleuthing by myself, so I can at least own that part; and through trial and purposeful error, I’ve seen the results first hand.  First, for those super excellent editors out there – I’ve heard through the wire that the compression algorithm affects JPG files more than PNG files, so if you’re willing to convert all of your images to PNGs – your photos will retain their crisp clarity and luminescence.

Master the Settings

Screen Shot 2016-07-07 at 6.11.50 PM

Do you know what the real difference between the top and bottom picture are? The bottom picture has smooth lines on faces and an even keeled blast of water, while the top looks more grainy, and less appealing.  I’ve heard some conflicting advice out there about exporting with a length of 720 or 960, and what I can say after some hands on experience – including the photos above, is that you really want to export at 2048 pixels, which is what the bottom picture is set to.  How about the one below? Between the left and right image – the sharpness of the right one is retained more than the left, and that’s the difference of loading a smaller image size, approximately 100k or less, so Facebook doesn’t compress the image itself.

Screen Shot 2016-07-07 at 6.31.44 PM

One more time, for your cheat sheet:

Length at max: 2048

Resolution: 96

Image Size: 100kb

To save these proper settings – On the bottom left of your Export Window, toggle ‘Add’ to save your user pre-set. When you’re loading your pics, make sure that you Easy-peasy, happy exporting!

Screen Shot 2016-07-07 at 5.51.31 PM


What are your perfect export settings for lossless Facebook photo albums? I’ve read a lot of variations of the metrics I’m using and would love to hear from other photo gurus out there! Let me know in the comments below.

[Traveling Tales] Plan Your Next Vacation With Google Destinations 

“We travel, some of us forever, to seek other places, other lives, other souls.”
– Anais Nin

The last few days have ushered in the pitter-patter of rain like cats nimbly playing on our roof, while the sun has chosen to haphazardly break through the clouds, reveling down onto our atmosphere and warming the land bits by bit.  Yes, you guessed it – Spring is just around the corner and we just had some “real weather” in Southern California, providing a fresh layer of powder in the mountains and a stunning ‘Super Bloom’ out in the middle of Desert Valley. Over the last few days, we’ve been itching to plan another quick weekend getaway similar to the Sequoias and it’s gotten me all antsy with anticipation for another adventure in the great outdoors.

The more I travel, the more I realize that though we can all enjoy a vacation -between determining the destination, booking the room, exploring extracurricular activities in the area and finding some fabulous food options- planning them certainly isn’t everyone’s cup of tea.  With the assistance of any number of websites that coagulate travel data across the hotel and transportation markets like Travelocity, CheapTickets and Kayak, a host of easibly maliable and managable mobile apps, and my uncanny ability to have way too many tabs open and organized in my browser window, it’s gotten a wee bit easier.  But let’s face it, it’s still not streamlined – so leave it to the geniuses at Google to revolutionize the online travel game.

Just yesterday morning, Google announced a new component to its mobile vertical – Google Destinations.  It’s an easy, breezy one stop shop of a vacation application that’s sure to take the stress out of your search and get you into some fun on the double. As the worlds premiere online search engine, Google claims that in the last few years it’s seen a 50% increase in travel related questions and queries generating on the site. After putting their heads together, they coagulates the metadata from Google Flights and Hotel Search to provide instant travel relief in the form of easy to browse itineraries and quick buy bookings from reputable sites.  If you haven’t taken Google Flights for a spin, I’ll be honest – you’re missing out.  The algorithms they’ve developed do a wonderful job of forecasting the best times for flights, not to mention it’ll link you with any number of other travel providers.

Unlike many other large internet travel providers like Kayak, Air BnB and Cheaptickets which offer multiple ways to access their data, Google Destinations is only available on your mobile device.  Though this move could be construed as an attempt to drive traffic to their mobile site, maybe it’s also a silent hint that we should be prepared for a mobile app from Google Labs.  Either way, though, I’m into it -.  If you want to take it for a spin yourself, grab that smart phone and let’s play along.

First, head to your native Google or Google Chrome app (and if you don’t have either, I would recommend downloading them immediately.) And now, let’s just dream a little and plan a hypothetical dream vacation. From tinkering around this morning, it looks like you can either use a State from the United States or a Country from around the world, paired with the word “destinations” – meaning queries like “California destinations”, “Canada destinations”, “Italy destinations” and the like.  Now, the real fun begins!

Once you have your general location in mind, there are three ways to manipulate the data.  First, you can filter by date – and if you don’t know the exact dates you want to travel, the ‘Flexible Dates’ let’s you just pick the months you’re considering.  Next, you can refine your search by the type of activity; or you can even include the keywords in your search with hobby terms + [Location] + “Destination”, like “California Surfing”, “Colorado Hiking” or  “Spain Skiing.”  If you don’t know what you want, let Google do some thinking for you and choose from the options are as below.  And last, but certainly not least – you can adjust the end price which takes into account 7 nights away; as of now, it’s only available for 1 or 2 travelers.

If you click through to your dream spot from the first search, you’ll be presented with a window with two tabs. ‘Explore’ gives a little bit of background on the area – including the most sought after locations in the area, various itineraries based on past searches, a birds eye view of the topography and annual meteorology of the area letting you know when the best time of year to go is and a variety of additional locations to enjoy based on your search.  Currently, Google only has itineraries for roughly 201 locations but I’m sure that number will increase exponentially with the use of the application.

If you don’t have your phone handy, don’t have a destination in mind or simply would rather watch someone else do it – take a gander at the video below.